Categories
design myomb notes

Putting together my first collection

Hello! My name is Renata and I started volunteering with Museum in a Box just a few weeks before this little world of ours closed for maintenance.

Starting at Museum in a Box

I started by reaching out to HQ to know a little more about Museum in a Box, and the work that the team was doing in that funky intersection where museum collections, playful education and mixed media hang out. It felt like such a malleable and imaginative idea, like the plasticine of museums. I thought it would be really cool to learn from a project working on how museum content and practices are experienced, made less formal, and shared broadly, and was particularly curious about how sound design and recording enables that.

After meeting George, Charlie and the beauty that is the HQ maker space, I got inexplicably excited about an idea that George mentioned – a collection of everyday noises. I really wanted to be a little part of it, and was immediately so happy to join. I think I found putting together a bunch of noises—something that can intuitively feel so meaningless—making them informative and joyous in their own understated ways to be a fun twist on what we believe museums to be. The idea of creating something with sound as its own nucleus and lowering the threshold for collecting things / making things / being excited about things were simply energising ideas to me.

(Also there was some excellent homemade ginger cake. What’s not to love?)

Why museums and sound?

I love museums as spaces of shared information. It’s really exciting to see how we collect objects: how we think about different materials and shapes and colours and functions, how we celebrate and exhibit objects with different levels of domesticity, the public and the private, the meeting points between intimacy and belonging. It’s a kind of topography almost, all things elevated and grounded, and the energy of both co-existing. Not making the ordinary any more extraordinary, but instead looking after it as its own enriched thing precisely because it is someone’s. Or trying to make sense of that either/or space where things live outside categories. Or when collections go ‘hey, let’s not exist inside a museum, but be somewhere else instead’. I like all of it.

Part of this was growing more and more curious about sound and how it is a portable, shareable, weightless container for information, storytelling, and textures. How sound can be something so familiar and modular, like words and noises in our homes, or something so new and informative, like music and signals from outer space or soundscapes from places we haven’t visited. And at a time like this, where physicality and presence are taking different forms, sound has been everywhere for me – objects that make sound and objects that carry sound, the sounds from the outside like little portals, the sounds and echoes of places we want to return to. I even found myself thinking about how different museum galleries sound, how each has its own base silence. Maybe I’ll make a collection about that?

Making a first collection

I had the joy of putting together a little Box of Noises, recording a few comforting / frustrating sounds at home, and thinking about what I found meaningful about them – the urgency, the softness, the cadence, my lack of descriptive sonic lexicon to precisely talk about each of those samples and resorting to comparisons and other senses to help me through. Got to love a bit of synaesthesia!

https://heart.museuminabox.org/view_collection/462

I learned a few things along the way, which I share with you now. I hope they can help you create your first collection too:

1. Accumulating a lot of samples will probably happen

Hopefully that means you’re enjoying the collection process! For me it was like suddenly I had created a radar for myself – every noise became a discoverable, recordable, at least marginally interesting sound. As simple as this might sound, even the really mundane objects became producers of sound.

I ended up running to my phone a few times to record the sound of something impermanent, re-enacting dish stacking and testing the same bag zipper going up and down an embarrassing number of times. The fact that I was collecting stuff had this almost activation energy about it.

2. Devise a system of organisation / archiving that works for you

This may or may not be your jam, but I found having a dual system really helpful – a manual and a digital one.

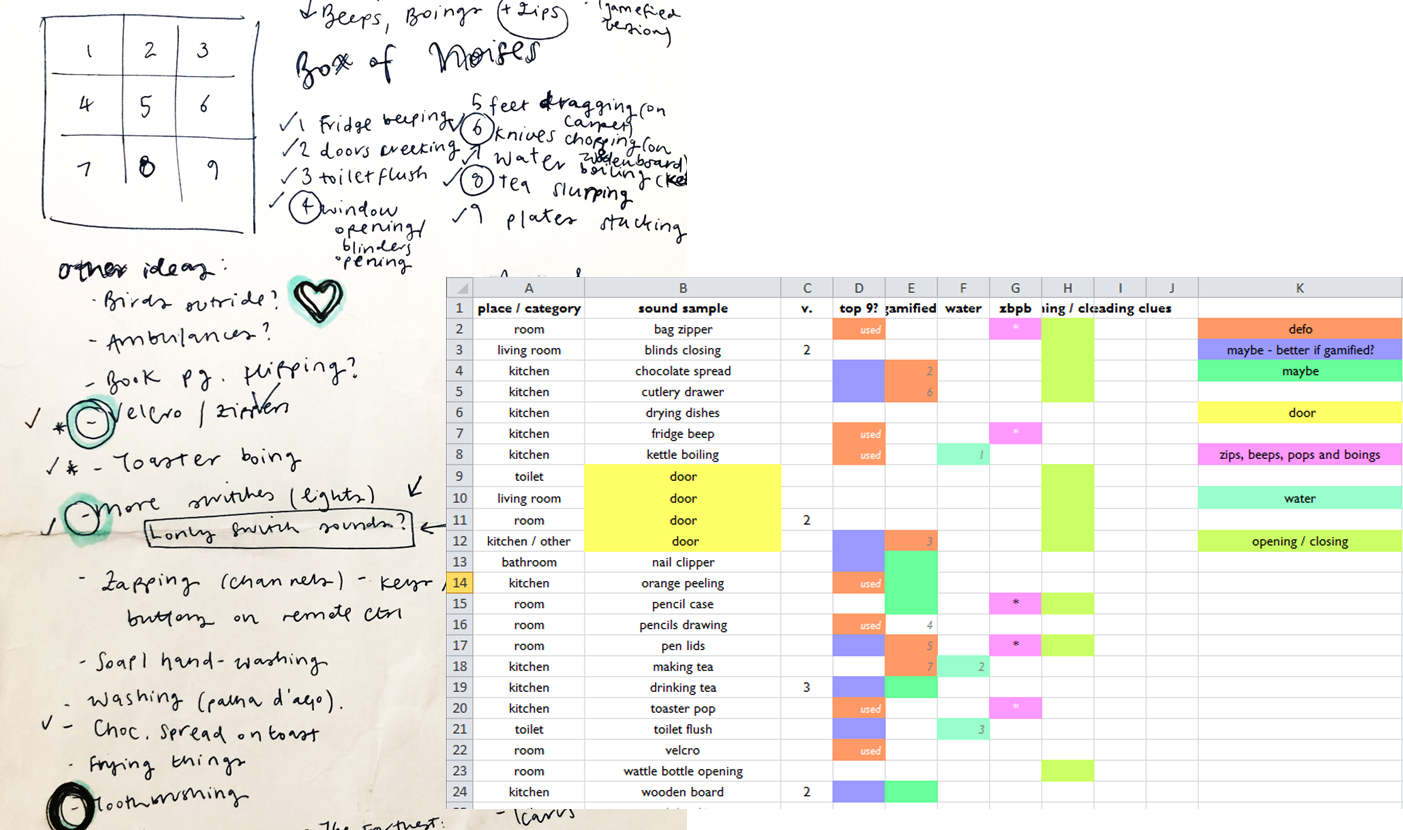
Fig.1 – My first plan for the collection: a piece of paper with a speculative list of noises I thought to collect and a grid to help me visualise where to place each illustration. The back of that page had my shopping list for that week. The spreadsheet is my final database of noises, including the room where they were recorded, the number of version for each sound, and the different colours which refer to different collection ideas, placing each sample into one or more collection it could live in. The orange ones made my final selection, with purple and green indicating a strong maybe / let’s save it for a gamified version of secret mystery noises. 

The paper list was first, the pre-recording part. It’s great for lots of brainstorming, and especially good if you like working in non-designated spaces, drawing and making connections between ideas really freely. I adore Excel (conditional formatting would probably feature in my version of My Favourite Things), so I used that as my post-recording organiser. It was great to lay out my samples, select the ones I wanted to use for the Box of Noises and allocate the remaining ones to other collection ideas I had. It was especially good to play around with placing samples in different collections and change things around without disturbing the structure too much or repeating sounds.

3. Lower the entry point for production quality

My biggest inhibition recording sound has always been the quality of my equipment – I don’t own anything immensely professional when it comes to recorders, microphones or audio software. Whilst I do think that a crisp, clean sound makes an enormous difference, it was really refreshing to just confirm for myself that recording with a phone is possible and plenty. I also ended up finding some fun details in my messy, occasionally static, full-of-background samples – subtle birdsong, my feet walking about, fire crackling under a pot full of boiling water. What you intended to record becomes a little more surprising.

I illustrated each sound, and edited my illustrations on PowerPoint and Paint, and using them was, quite simply, pure childlike joy. Using what you’ve got is more than enough.

Calling things things is OK too.

4. Metadata is cool

As the little child who would sketch and take notes at museums (public apology to my mum and dad, and anyone who has ever had the unsolicited misfortune of coming to an exhibition with me), I found the idea of adding my own metadata to be a super cool feature. Although I haven’t yet added any details to my Box of Noises, it creates a really exciting investigative vibe for the whole process. I was suddenly curious about the brand of the kettle, the number of decibels on the fridge beep, the names and numbers of the colours on the pencils I was using. A language of precision became really indulgent. It is also a cool way to make you think about how you might map out an exhibition – what categories would you go for? Would you walk the visitor through your objects chronologically? Or organise your samples according to the different parts of the house where they were recorded? Or flow from samples of natural sounds to samples of mechanical ones? Maybe organise them from softer to noisier materials? So many possibilities!

5. Respond to your own questions by experimenting

This might be the most powerful thing about creating your own sound collection. You have the immediacy to play around with variables, see how the sound changes, record again, try again a little later, satisfy whatever questions pop into your brain by testing things out.

How would the sound of sizzling onions change if I added bigger chunks? How would different faucet openings change the stream of water and its sound? How different are the sound waves and peaks produced when opening and closing doors, packages and strips of Velcro in slower versus faster movements? You can get to really funky variations of the same noise and really isolate what is most interesting about it.

6. Record patterns and collection ideas that come up during the process

I ended up having a bunch of leftover samples, but not in a way that felt wasteful. I ended up wanting to make something with them – future collections, writing prompts, sound effects for future birthday videos I will probably end up making for friends. It was super useful to have a growing list of things I would like to make collections about. Some of them were inspired by common patterns in the sound samples I collected, some were inspired by the objects themselves and the comforting act of meaningfully collecting.

I am working on a collection called Hydrophonics because so many of the sounds ended up being of water in different containers, with different pressures, hitting different materials. I ended up realising that my daily sound production is mostly opening and closing things – doors, packages, fruit, books –, so I’d like to do a little collection solely on Opening and Closing Things. If collections are part of our acts of remembrance, I would like to grieve The Objects I’ve Lost and think of how to showcase objects that simply aren’t here with me anymore. (This is an At Home version of a project we had talked about at HQ back in March, which is cool to think about because it means that we can adapt big ideas into something that can be done from our corners and with our current resources.)

Keep track of all those thought bubbles that appear when you start realising the interesting intersections between your sounds and your objects, maybe it’ll lead you somewhere next.

7. Copyright is funky and a little confusing

I found this part a little tricky.

A good place to start is to record all your own sounds and create all your own illustrations or photographs, so you know you’re not taking any work from anywhere else. That’s also a good way to really explore your own territory of sounds and ideas, and see how enriched it is already.

However, when thinking of other collection ideas, I realised that some of it was going to involve compiling things from other sources, and overlapping some of my thoughts on them. I am still learning how to work with copyright to honour the work of others, and communicate that transparency in the best way possible. I am still not too sure how to best go about it, but I think it is something worth thinking about and referencing as well as possible when putting your collection together. Also, when you create your collection and choose the licensing settings, you can click on the links to find out more about how each type can be used – something I really appreciated!

8. Adapt big things into little things

Putting this collection together was a great reminder that our homes are full of cool things to explore and dignify. We can’t go to museums right now, which means we can be resourceful in other ways and really stretch how far we can go with the concepts of big words like collections, exhibitions, museum, knowledge.

Whatever is accessible to you at the moment can live in a collection. You can make your own collection of cubist drawings or use cardboard boxes to make your own galleries. But mostly, you can turn that V&A exhibition about Disobedient Objects into your own collection of things that you might have used to rebel. Take the idea of a series of archived sci-fi objects into a collection of your favourite ones. Put together some homemade sounds that could be part of a catalogue of sci-fi sound effects. A gallery of world instruments into things that make misleadingly percussive sounds at home. You can use the sounds you are recording to localise those big ideas. If museums are spaces of preservation, it’s like you get to make your own pickles. You can make At Home versions of these huge artistic movements and practices. For example, I have found research to be immensely enjoyable and freeing. I ended up finding out more about pencil manufacturing, Japanese onomatopoeias and different cloud classifications.

One of my favourite things about Museum in a Box is museum and home collections co-exist, at least for now, and I think there is something really grounding about that. 

Categories
design education research

Tortoise, not hare: taking care developing our #homeEd approach

We’ve begun working on what it can mean for families to have a Box at home. It’s a place we have imagined Boxes to be since we started the company, so we’re excited to have this new opportunity. I’ve referred before to those old photos of a family sitting around a gigantic radio in their lounge, the radio practically its hearth.

We have also declared this lady our spiritual guide for this phase of “A Box at Home” product development:

On Tuesday, we had a great international Zoom with the MB team (George, Charlie, Kate, and Renata), Sara Cardello (Head of Education at Smithsonian Libraries, and Mum to Bruno), Jocelyn Swanson (Montessori secondary educator), and, last but not least, Brittany Berry, whose school recently purchased nine Make Your Own kits to use across the school.

I wanted to hear from Brittany about how the school had been using the kits, and it’s brilliant! (About 30-40 kids creating content, assuming various different roles in the production process, like writer, audio editor, 3D scanner etc). The school is part of a brilliant program called EAST, or Education Accelerated by Service and Technology. The students engage in real-world projects in their communities, learning 21st Century creative and critical skills as they go. You can see some of the collections being developed on Heart.

You can review the call agenda (and my notes in the doc) if you have all the time in the world. And anyone using that link can add a comment – please do if you have something to add!

We’re still parsing that very first discussion, and we’re yet to come together as a group again — because pandemic??! — but I plan to post here as there’s more to show, or ask.

Our rough outline for next steps are:

  • Summarise key directions for public consumptions
  • Create some first draft resources to publish on the website about project ideas (but being aware that the whole internet is full of them right now, and in spite of this, kids are feral and that’s fine!)
  • Rough pass at a user research trial plan
  • Have another chat with the project team

Two early ideas about projects that could be done at home which aren’t explicitly connected to a Box but easily could be are:

  1. Tell and record your family’s history, or
  2. Keep a diary of what it’s like to live through this.

Telling our stories of COVID-19

We’ve noticed already there are projects popping up about this, and we’d like to try to gather links to them where we can. Maybe there’s a project on it later, maybe we can use them as examples for people who might like to try an audio diary. Maybe it’ll be nothing!

Read more about Telling Our Stories of COVID-19?

Get involved?

If you’re an educator or a parent, and interested to contribute or otherwise participate in our research and design process, the best way to start is to join our dedicated #educators channel on our public Slack that anyone can join, if you’d like to join in to discuss this work, or hear about new resources.

Categories
archive company news design

Hardware History

This week at HQ, we’ve started doing something called “deep work”. The people at Do Lectures, whose book we’re reading this month about writing good email newsletters, recommend it as a way to not be distracted by all the things that pop up in our lives now thanks to our phones and the web and all that. It’s good! We’re going to persist.

Our deep work mechanics at this stage are that I’ve set an alarm on my phone that goes off at 2pm, and again at 5pm, and in that window, we try not to use our phones and turn off the WiFi on our laptops.

One of the main jobs we have at the moment is to think more about sales and marketing. We haven’t especially done any yet, apart from talking about our work to people who mostly already know us, so we’d like to broaden our audience a bit – hence reading about writing better newsletters. Would you like to sign up for our newsletter? We thought we’d start with our homepage, which hasn’t been changed since we wrote it, really, back in 2016. (Not proud of that!). So, we’re working on that.

During that exercise, we were flung off into a lovely exercise of pulling things off our shelves, and arranging it — or knolling it — on our big work table. It was really satisfying to see how Museum in a Box has evolved.

Here’s a wobbly panorama of the whole scene to start with. Packaging, Box inserts, the Box and its various design branches, the “brain” which is all the hardware/software inside, our progress bar, and the sound elements, from volume knob selection to amplifier design.
You can see the Box insert cards, from the very first idea of a scribbled “Updates” card, to our current TRY ME! cards, which give people who’ve bought a Make Your Own kit something to play before they’ve finished their collections.
These are the various elements of the “brain”. From earliest at the top, to most recent at the bottom. Exciting to see Adrian’s very first comp of our physical progress bar, which we developed because the Box took about 30 seconds to start up. Now it takes about 12 seconds!
And finally, we have about ten hardware versions we consider to be major milestones in the design. It’s not quite Dyson’s 5,000 iterations, but we aren’t as rich as him, so, there’s that. It’s still really satisfying to track the design evolution and how we’ve continually synthesised feedback and technical considerations.

We’ve parcelled all the iterations up into their own labelled boxes on the shelves instead of them being all over the place, which I find comforting.

Possibly the best bit is that Charlie’s also made an awesome 3D model of the table with all the bits and bobs on it!

Categories
audio design manufacturing myomb packaging shipping shop

New Year, New Box, New You!

“Radically better”

As we move into 2020 we want to take a moment to talk about the latest version of the Box, version 1.3. We’ve dedicated much of the last year to developing it, and we LOVE it!

Our new v1.3 Box design
Behold version 1.3! Think it doesn’t look much different? Think again and look under the hood…

At the beginning of 2019 we sent 40 boxes around the world in our pilot. Following the feedback from that, and coupled with a wish list we had already built up, we identified a number of ways we could improve the Box.

At the same time we set ourselves the ambitious goal to build 1000 boxes by the end of the year. Building large numbers of the previous design wasn’t ever going to be practical, it was made up of a tangle of wires that we had to hand-wire ourselves and it relied on a variety of components ordered online from a multitude of suppliers. The Boxes were also subject to the occasional injury when transported around the world, so it’s suffice to say we had our work cut out!

Some of the ways we sought to improve the design included:

  • Better audio – louder and clearer!
  • Faster assembly time
  • Fewer parts
  • More durable design
  • Logging boops offline

And so we started work in the spring; Adrian worked on designing the PCB as a neat home for all the components that were previously crammed into the box, George developed the awesome instructional graphics on the board and worked on software improvements, and Charlie designed a new acrylic ‘skull’ and mapped out the positions for the electronics and how they would be mounted inside the Box. So here it is…

The new PCB…

We LOVE the new PCB and it has a few important features worth talking about. Importantly there’s no wires. Previous Boxes included a large micro-USB extension cable, aux jack, and loads of wires which got in the way. Now the jacks are tiny components that sit at the back of the board and are devoid of the tangled wires that criss crossed older versions. This means we no longer have to hand solder anything (Yay!) and the boxes will be far more durable, reliable, consistent.

The ‘Brain’ of the Box is now a neat stack of three separate boards: A Raspberry Pi 3A+ sits at the bottom, then there’s our main custom board and progress LED board (affectionately known as ‘Blinky Lights’) which slots in a right-angle socket; and finally we have a stacking header and plastic standoffs which raises the reader high above the main PCB just underneath the surface of the box. Primed and ready for Booping!

Our beautiful board (note the handy prompts to help you understand what’s what!)

There’s now a REAL-TIME CLOCK (RTC) too. Previously if a Box wasn’t on WiFi we had no way of logging when a Boop had happened because the Pi doesn’t keep track of time when it’s not online. So this new RTC allows us to timestamp a Boop and log it next time the Box is connected to a WiFi network.

Testing the board and speakers for the first time

Then there’s the DIGITAL-TO-ANALOG CONVERTER (D.A.C.). As the board says the D.A.C. ‘converts digital audio into analog sound for the amp’. This along with our super swanky and loud speakers make for waaaay better audio, that is free of static and incredibly clear. This alone makes the experience of using a Museum in a Box, particularly in noisy environments, so much better.

1000 Speakers!
1000 custom made speakers!

The new speakers not only pack a punch but also weigh a lot less which in turn makes them far easier to mount. V1.3 is almost half the weight of previous versions which will reduce both the cost of postage and it’s environmental impact when shipped around the world.

The new Skull…

A side by side comparison of the Museum in a Box design changes from 2018 to 2019
A comparison of the Box design evolution from 2018 to 2019

With our new PCB came the challenge of mounting it inside the ‘Skull’. Past versions required us to fix bits to the sides, top, and base with an opening on the underside. This was fastened by screws in the feet and some t-nuts that were an incredible pain to mount and often came loose!

The advice we kept receiving when talking enclosures was to injection mould it. The main benefits of that being a moulded enclosure is ‘preassembled’ and ready to put the electronics straight in. It’s also very scalable and would allow us to integrate snap fittings into the design for mounting components inside.

To explore this we did a lot of research into moulding and a bunch of work CADing and prototyping different enclosures. We also took a team trip to visit Protolabs in Telford and learned a great deal from the brilliant people there and received an exciting factory tour of their setup. We attained quotes but ultimately decided not to go with injection moulding for two reasons:

1. The upfront tooling cost is very high and hard to justify for the small batches we planned to initially produce.

2. The overall aesthetic of the Box has become part our identity. The ability for us to easily modify the design, and teach others to build the Box (such as our amazing Verizon volunteers!) feels much more appropriate for our scale and values.

So, having decided to stick with our laser cut look we needed to find a neat way to mount the PCB inside the Skull. The solution was to switch from a bottom opening to a front loading Box. We created a neat groove on the back panel for the PCB to slide into and sit neatly in the middle of the box, lining up with openings at the back for the micro-USB and aux jacks. The Box can now be opened, the PCB removed, and replaced in mere moments!

Get in the groove! The ledge the PCB slots and rests into, lining up with the aux & power jacks on the skull.

The extra front and back panels are held in place and made removable by using some neat snap rivets which can be removed from the outside. We used these rivets for speaker mounting too where before we’d faffed about with tiny nuts and bolts and a laser-cut stand.

Blinky Lights – We use these to indicate that the Box is ‘warming up’ and ‘ready to go!’

Other new features include a new progress LED board which is slicker and uses some recycled acrylic offcuts for the shims that we sent to the PCB manufacturers European Circuits. We spent a long time looking for the perfect light pipes to use with surface mount LEDs but ultimately decided to stick with through hole LEDs and our big green green LED. Why? Because they look bright and amazing!

New Packaging!

A new Box deserves new packaging to go with it. We revisited a previous design using a more compact container and an insert that conceals the power plug and various admin and try me cards so all you see when unboxing is your shiny new Box!

Finally there’s the latest version of the software. We’ll talk about this in more depth another day but we’re chuffed that the Box now boots up waaay quicker than it used to and includes more audio guidance when working through steps like WiFi and updates.

The new assembly time…

With our new design manufactured we decided to assemble the first 20 Boxes. We were blown away to discover that assembly now takes ~7.5 minutes per Box – a 2000% increase from the old design!

George and Charlie building 20 boxes in 2.5 hours!

In future this saving will enable us to fulfil orders quicker than ever before. The Box was intentionally designed for disassembly and as a result we proudly no longer use glue during the assembly process. The Box will now be much easier for people to disassemble and recycle at the end-of-life and we will share a breakdown of the parts and materials inside the Box in due course to make safe and appropriate disposal even easier.

And so with our shiny new Box design came our first test…

First boot up of v1.3… we figured out the Zeus print, eventually!

So there you have it, our new Box and the culmination of over nine months hard work. I hope that proves an interesting insight into some of the design decisions we made in developing v1.3. We love it and we hope you do too!

Our shop is now online so you can buy your very own v1.3 Box with a Make Your Own kit now! Kits are available in Individual, Educator, Small Org and Large Org options and colours include CMYK, Transparent, and Plywood.

Box colours range: Cyan, Yellow, Transparent, Plywood, Magenta, Key
Box colours include: Cyan, Yellow, Transparent, Plywood, Magenta, and Black

Have a wonderful New Year from all at Museum in a Box.

📦🎁🎅🎄🧦🎉🛠️🏺🏛️🔌💡🔉🌰

Categories
brain company news design

On the ground at HQ – our 100 Box run is coming together…

It’s been a while in the works, but things are looking very good to build out our biggest run yet: 100 Boxes!

It was our goal this year to figure out how to make 1,000 Boxes, and, well, even though we’ll probably only build 100, that work has allowed us to understand and have a way forward to making Boxes much, much more quickly.

The Skull

Charlie has done the lion’s share of the work associated with making the “skull” or exterior casing of the Box even better. The shape itself has been simplified and optimised so it’s much quicker to assemble. We were lucky enough to have a hardy bunch of volunteers from Verizon Media help us build 100 skulls in a day a few weeks ago. The first time we made skulls, it took about a day to make three.

At the end of the day, you can see 100 skulls made!

The Brain

The Brain is what we’ve always called what’s inside the Box… the electronics. Here is where we’ve done a ton of optimising… and revealing the tech. Before, we would have gathered all the various electronic components from all over the place, from wires to resistors to washers to everything. We assembled them by hand here at HQ.

But now, we have our very own PCB design, largely laid out by Adrian with a few design touches from me, and it’s a thing of beauty, and, importantly, not made by us, but by trained professionals at European Circuits.

George holds the new design in her hands for the first time!

And here’s Charlie turning it on, mere moments ago.

The very best part is that we’re still on our production schedule track to make the 100 Boxes next week, and then SELL THEM ON THE INTERNET.

We have our shop online now, at shop.museuminabox.org, so if you’ve been wanting to buy a Make Your Own kit, or a Museum in a Box tote bag, or even our Greek Gods & Goddesses collection (although you’ll need a Box to play that), now’s your chance!

Be the first to own one of our snazzy tote bags!

Categories
brain design

Technology is a tool, not our master

When people see and try a Museum in a Box for the first time, after they’ve been charmed by the magic and wizardry, they’ll often ask how does it work?

Once we start down that line of conversation, it also doesn’t take too long before people ask have you patented this?

The fun part is, we tell people exactly how it works. It’s a combination of Near Field Communication (NFC), a Raspberry Pi, and a few other bits and bobs, which we happily explain.

Illustration of main components, by Charlie Cattel-Killick, February 2018

We’ve also made boxes out of transparent acrylic so you can see exactly how it works. I was chuffed when I handed one of our transparent boxes to my nephew, Alex, and he was able to identify, describe, and connect each of the hardware components into the whole. And I’m not just saying that because he’s family. I was genuinely impressed.

A transparent box alongside one of our early physical prototypes for our new internal layout

In one of our recent commissions, with Monroe County History Center, we loved hearing that they thought a transparent Box in particular would be of interest to their community. The commission was about developing reminiscence collections for folks suffering from dementia and their carers, and quite a few of the men in the programme had an engineering background, so we hoped there’d be interest in the device itself, as well as the 1960s.

We also want to make our design available in an open format so students can literally make their own boxes too. I suspect we’ll end up doing this with one of our early designs which maker spaces or classrooms may have the components to hand to fabricate their own Box. As we’re marching towards higher production volumes, that’s meant developing internals that are much quicker to assemble, and can be made in large volumes. We are developing a Make Your Own kit version this year, so far focussed on the content side of things – like choosing and digitising objects, writing and recording their stories – but we’ve always hoped to extend Make Your Own to include the hardware piece too.

That brings me to our newest design innovation, which relates to our new and improved printed circuit board (PCB). Instead of us hand-crafting the internals – because I should never be making wiring looms! – we’ve now got a super-slick, all-encompassing PCB which incorporates and unifies the amplifier, digital-to-analog audio conversion, power for the Box, our physical progress bar, and allows us to add a real-time clock to help us manage and record when objects are booped.

As Adrian and I chipped away on the PCB layout, I found myself unable to recognise or interpret what all the wiring bits actually were, and needed Adrian to label them for me. Then it dawned on me. Why not label them for everyone? Why not explain transparently exactly what each bit does? So, I designed cheeky labels for each of the main components, so you can familiarise yourself with it all.

Illustrated PCB
Our shiny new annotated PCB!
Blinky lights!!!!

We’ve also redesigned how the Box opens up, to make it easier to pull the guts out and have a look. People – often men, interestingly – tell us “but you could just do this with a phone”, and we nod politely and say yes, you could. But, a) that’s just another screen in your life, b) you can’t just pull your phone apart to understand how it works, c) we want the Box itself to be part of the experience, and d) it is also an educational element of the whole idea.

I’m still not sure if we’ll patent the hardware design, but I at least wanted to establish a state of the art on the annotation-on-the-thing idea with this blog post. That might mean we get totally stiffed by some giant megacorp, which would obviously SUCK, but, I prefer to radiate generous intent.

Categories
company news design myomb

Make Your Own: A Visual Essay

The last few months have been nuts, frankly. We’ve made 80 Boxes, and are sending about 40 of them to our Make Your Own Museum in a Box pilots, all over the world (every continent except Antartica!?!). We’ve upgraded the Box to V1.2 to incorporate a new amp/sound design, and a much less expensive RFID reader. That’s good.

I really liked what our amp-soldering helper, Thomas Butler, said back in November:

Getting into ‘mass’ hand manufacturing of amp boards for @_museuminabox @DoESLiverpool.

80 boxes is a lot. The most we’ve ever made or had. Now we even have inventory (but even that’s disappearing!). It’s great. Next step is to figure out how to make them even more quickly, and even more cost-effectively.

Thank You

  • The magnificent and thorough Thibaut Evrard, who did the lion’s share of construction
  • Irfan & Noufal at Hamon, who have coded up the web app our pilots will need to configure their collections & boxes
  • Tom Armitage, who designed our new Amp, nicknamed “Boomer”
  • Amy Haigh, who helped kick off the Make Your Own kit design process
  • Tom Butler, who soldered all Tom A’s amps in quick smart time
  • Takako Copeland, who made our lovely WiFi cards by hand at the London Centre for Book Arts
  • Paul Beech and the crew at Pimoroni who sold us lots of hardware, but also did tons of laser-cutting for us
  • The 30 or so suppliers on our bill of materials, and of course
  • Adrian McEwen and Charlie Cattel-Killick who continue to ride on this crazy horse to find out where she’s going.

 Making Boxes

Pilots Getting Started

The boxes are making their way out into the world now. We’d post more, but there’s only £19 in the account. (Not for long. It’ll be fine.)

Categories
company news design myomb research

“If the pilot was wildly successful, what might that look like for you?”

We’re doing an international user research pilot to trial our new version of Museum in a Box we’re calling “Make Your Own”. Our plan is to work towards having these kits for sale in time for Christmas 2019.

We have gathered 40 hardy groups from around the world to participate with us, and our first step was to interview all of them. We were lucky enough to meet some in person, and Skyped with everyone else. Here’s a map of where they all are:

Map of our 40 international pilots: schools, museums, cultural organisations, artists, home educators, libraries, and even a farm!

It’s been exciting and informative to meet everyone. We’ve gathered all kinds of tidbits about their lives and work, and have particularly enjoyed hearing about how they would like to use Make Your Own to extend their own missions and work. We were particularly pleased that this group of 40 probably represents a pretty good cross-section of folks we hope will become customers (although anyone is welcome to buy one!).

We’ve used the same set of interview questions for everyone, and I’ve been most interested in the response to this one: If the pilot was wildly successful, what might this look like for you? I thought you might like to see what people say to that…

The Pilots’ Responses


If I have more students come and ask me about it, and come and ask me to participate. They’ll ask me about it. Initiating a conversation with me is a winner. If I speak to new students, that’s huge win. I’m 5 feet, most of them are taller than me.


Well, if we’re successful, that means like you’re successful… we’d make more connections with other pilots… we could get more resources from all over the world, we’d be pilots… You’d get more funding so everyone would benefit.

It just hopefully opens up the program so more people and schools can participate, so more schools and kids can benefit.

“You’ll need to appreciate art and music and the past and why you shouldn’t knock everything down.”


Seeing Museum in a Box in campuses and students create collections by themselves and spread them out


It will be a success, maybe if a student thinks we can do something bigger. Maybe we can make a big Museum in a Box! We can also present this to other schools around – there are about 20 small schools near us.


Anything successful would be being able to demonstrate learning, this is part of why I want to make a study to prove it. There are also a lot engagement  for the students for culture and everything. But the main reason for me is proving that it works.

It’s not just about if it works but more to show me that it demonstrably increases learning. If you do this then schools want it. Teachers listen to teachers and listen to research.


We would like to create something that would be able to see scale sustainably. Every single time we have a new museum collection, what could we put on Museum in a Box? I would love to see and understand the business model. Really about what we scale and what the students are going to create at the end.


People engaging with it during the market. Asking more questions, trying more cards. Having Laura (market master) want to take it and use it outside the market. Inspiring envy, obvs. If nobody is interested I will have failed.


That the box can create that kind of ongoing engagement (with young adults) that goes beyond the interaction with the box. We would like to see that after interacting with the box, there is some kind of ongoing engagement with the subject. Don’t know how to measure it yet. Maybe it’s an ongoing affiliation with the project. 40% of the visitors are repeat visitors.  Develop engagement/affiliation with MB and stay active and develop their own collection or pursue direct action with the artists. Can MB trigger that kind of interaction? Enable a deeper connection at large.


That I have played a role in this successful project. It’s a privilege to have helped. It would be a good reflection for me, and for my school.


I talked with the local museum, and they might be interested in purchasing it, and they’re really exciting about reproductions. I don’t want to jump the gun, but I love this open access tech, and helping people encounter the world in this way.

Success for MB would be repeatable programs/lessons.


People wanting the box everywhere!
I know a lot of art teachers around Portland. Would be good if our box could travel around the city, and have other teachers interested. Giving the students some pride at their collection. Sharing it will be the best.


It would be something I can present as a new way to experience sound and to interact with it. A new medium for sound. Knowing how it works and can be used in different context, could it be something people can have in their homes? Could it help people?


I don’t know! Just people enjoying the fungi collection all over the place. Getting excited about fungi.


I think that I don’t have to touch the box too much. It just wanders around, without me, and it doesn’t sit in my house… there’s demand to see it and use it. Potentially, a proliferation of Boxes or Collections.


The children would be able to find a way to learn and create their own experience that they can then share with their families.


I need to figure out how to put it in front of people. We frequently do prototype testing… I can imagine setting it up in one of the halls – see what the response is.

For me, I’m interested in seeing the ease of using the Box, the variety and richness of using it, how visitors respond to it. Would we do pop-ups or offer for sale in our gift shop. Can we offer to visitors to create their own? We’ve tried various citizen science projects… esp for the collections, it’s not just a bunch of stuff. They tell you things.


Success would be kids getting knowledge or study drive from Museum in a Box. if they can be inspired by the role models, it is already a win! Get them willing to stay involved and do more.


Would be around outcomes for the Young People’s Programme. They feel they’ve had ownership, developed understanding of collections and exhibition-making and digital side of things. Practical skills and comprehension of how galleries and museums work.

Internal conversation continuing about what we’d do around our collection.


We would want to find a way to keep the Box at the end, and send it out ourselves. I would want to be in a position where we can send it. Could be used by locals, or make connections all over the world. Maybe with other composers or other forms of music.


Success would be getting a lot of people interacting with the project and increasing the audience of the museum. being able to expand. getting more people involved in the creation and engagement with content. Getting the kids to want to be part of the project.


I don’t know how it will be successful, but it would be nice to build upon it, maybe a Katakana version (simplified). It’s quite a commercial, ready idea. Could be arty; more ambitious.


A tool that the audience would find useful. Also all the team of the museum to get ideas of how to use this box. How can we help people that collect stamps?


To make the pilot successful the pilot would need multiple people involved, as well as information sharing, to interest other programs to implement the box more widely in the system. I would love to see   a Museum in a Box project every semester in the class.


Get other teachers involved with my department. Like the art classes upstairs.


If people engage with the collection and find way to interact with it then it would be successful. Then, I can try to push the concept and pitch it to local indigenous libraries in order to try to help them experiment with Museum in a Box.


It’s about making sure the children realise why they’re doing something, and give them the opportunity to showcase what they’ve done. It’s key for children to share, too… it’s not just “Miss” at the front telling things, but the kids are making the stories…


It would give us a sense of pride, for working it, and it taking off. A sense of connection and achievement for being involved. The excitement of contributing to something that’s worked.


First of all, awesome. If it works, I wouldn’t mind using this tool in different museums, and have the tool in different museums to allow people to interact with it. Can we use it inside our projects/exhibitions? That would be a success, actually. Let’s see how this will be useful for us. I think it will. Maybe in the next year, if this works, let’s see how we can expand.


We’d like to make many more pilots, and disseminate music to as many spaces as we can. 

It will be really interesting to see how kids react, and develop something around that. It will also be interesting to teach the kids to figure out what to make. Maybe the kids could start making their own thing, about their places.


If it’s successful we would have a permanent display in each of the museums, and they would run programs and create new collections that would be on display.


How about that? SO MUCH FUN.

Categories
commission company news design education

New Commission: Smithsonian Libraries!

It’s a sign of a crazy last few months that I haven’t been able to write properly about our biggest project yet. At the end of April, Charlie, Adrian and I went to Washington, DC, to hand-deliver 11 Boxes to  Smithsonian Libraries.

This slideshow requires JavaScript.

This commission is huge for us in several ways:

  1. It’s the Smithsonian Institution.
  2. It’s the first time we’ve been commissioned to deliver more than one Box.
  3. It’s the first time we’ve been able to bring in folks from the creative industries to join the crew  specifically, two writers, three actors, and a big fancy-lookin’ recording studio. This allows us to demonstrate our content creation capacity (so if a museum wants to commission this service from us, we can show them great work).
  4. The deployment is being formally evaluated (and that’s already really interesting).

This is the first of a couple of posts I’d like to write about this commission, one other perhaps about how we’ve also been able to level up in our Making Boxes skillz.

Background

Back in 2016, Martin Kalfatovic was in London to celebrate the 10th birthday of the magnificent Biodiversity Heritage Library project, and I asked if he’d like to pop by our office to say hi and see what we were up to with this weird little box thing. He came, he liked it, he paused for a second, and then said “What if…” It wasn’t long after that when he introduced us to Sara Cardello, the Education Specialist at Smithsonian Libraries, whose job it is to get Libraries’ content into the hands of kids.

It wasn’t long after that when Sara and Martin asked us to make a Box for them to show to their Board, to get the idea across and pique their interest. We made what remains one of my favourite Collections to date, Frogs in a Box. It’s a favourite because of the name, frankly, but also because it does a very simple thing well: it blends the collections of two different parts of the Smithsonian into one place. There are photographs of North American frogs from a book published in the early 20th Century combined with Sounds of North American Frogs, an incredibly detailed and rigorous audio commentary in Smithsonian Folkways by a American herpetologist called Charles who, as I understand it, basically spent the 1950s travelling across American recording frog songs.

We decided to go for it, and trial the idea on a smallish scale. Small scale for Smithsonian, large scale for us! Sara – who has proved to be Herculean and brilliant – spent the next 18 months looking for a way to fund developing more boxes to support the development and distribution of the SI Libraries UNSTACKED programme. And then, success! She secured support from two different funding bodies: the Asian Pacific American Initiatives Pool, and the Youth Access Grant supported by the Gates Foundation. And then, wow! We were ready to go. Incredible.

Here are the project specs:

  • 11 Boxes
  • 2 Collections for each Box
  • 7 schools and 2 “discovery spaces” across the USA
  • 40 postcards and 4x 3D prints in each Collection

Collections

We planned to create two new Collections for the project, and each one shared the same structure of four main themes + 40 postcards + four 3D prints, but the content was very different.

Stories of Migration from the Asia-Pacific to America

Following the stories of four characters in the form of letters to and from their families. Ben from China, Hong from Vietnam, Abraham from Bikini Atoll, and Rhea from New York (with family from Trinidad & Tobago and India). Sprinkled with facts about rules and regulations for migrants new to the USA, and hints of cultural expression from home countries, this set is an emotive and personal look at what it would have been like to make the big journey in search of something better.

Here’s one of the stories from Ben:

Crew

Curation & Writing: Louise To
Actor: Suni La
Sound Recording: Offset Audio
Sound Post-Production: Charlie Cattel-Killick
Director: George Oates

History of STEM from the Dibner Collection

Four sets of cards aligned with the STEM categories: Science, Technology, Engineering, and Maths, this set tells various stories of the history of STEM through imagery in some important scientific texts from The Dibner Library of the History of Science and Technology mixed with first-person accounts and other dramatisations of scientific subjects.

What might it be like to actually be a Black Hole?

Crew

Curation: Liz Laribee
Writer: Tom Bowtell
Actors: Becky Wright, Hemi Yeroham
Sound Recording: Offset Audio
Sound Post-Production: Charlie Cattel-Killick
Director: George Oates

Now what?

I’ll plan to write a bit more about the design, production, delivery and evaluation of this commission – it was a big step for us in terms of our production capacity. In the meantime, here’s a quote from one of the kids we met in DC:

“This is actually my first time enjoying a museum” from Museum in a Box on Vimeo.

Categories
audio brain commission design

Our First Upgrade!

The Jewish Museum London (JML) commissioned a Box from us last year, about remembering Jewish people who served in WWI and WWII.

They got in touch with us again this year to see about doing an upgrade of their Box – our first upgrade!

Since we delivered the initial commission, the Box’s core design has seen some important changes, and in fact, we declared V1.0 of the physical design back in February this year. We’ve also been gradually improving the software that runs the core Box interactions, so this was a good chance to upgrade the code on the JML Box while we were poking around.

Physical upgrades

  • The plywood ‘skull’ has been simplified with the speaker and power jacks now exposed on the back of the box, along with access to one of the Pi’s USB ports. (We’re not sure what we want to do with that yet. One idea is to incorporate a microphone into the mix.)
  • Most of the previous perforations across the older ‘skull’ have now been filled in, to focus the sound (so it doesn’t just bounce around inside the box), and most importantly,
  • We’ve replaced the old tiny stereo speakers with one beefy new mono one (see below)!

Our beefy new speakers!

So, to do the upgrade, we took back the museum’s old Box, gutted it, reusing  what we could before cutting them a new V1.0 Box in plywood, reconstructing it with the new sound components, and handing it back.

There were two other important aspects of the upgrade: the audio clips and the software. The museum had tested their Box in schools and found the audio was too long. We’ve been evaluating this challenge across all the Collections we’ve made, and developing a much better understanding about audio duration and content types that work really well with young children. Our main conclusion is – perhaps unsurprisingly – if clips are too long people begin to disengage and switch off. Therefore, the museum trimmed some of their lengthier tracks down and we republished them to the Box.

Now, with WiFi!

It’s now possible to configure each Box in situ to get on to a WiFi network, so we made the cheeky addition inside the shiny new packaging – a WiFi card! The card allows the box to connect to a local WiFi network with the assistance of a smartphone, tablet or computer.

The upgrade gave us the opportunity to test the new wifi configuration out in the wild  for the first time as well as update the shortened audio tracks onsite using the museum’s WiFi.  Once the box was online, and after a little troubleshooting had been done, the box automatically pulled down and updated the new audio tracks!

What WiFi means for the future

Upgrading the Jewish Museum London’s box has been a great testbed for us to learn how we can retro-fit and improve upon older boxes as well as provide on-site updates to content without the need for physical intervention from us- this is an exciting development that’s heading towards our long term goal, where we can offer subscriptions to people who have Boxes. Say you like Natural History” and you subscribe, every month (or so), you get a new set of things delivered from museums all over the world, and your Box just knows about the new set of things because we’ve been able to update it in the background.

Huge thanks to the JML crew for inquiring about the upgrade and for being patient while we figured out a method of best practice!

Charlie